This is an updated guide to have a jailbroken 1.1.3 iPhone with everything in the 1.1.3 update working with no "fixes". It will be cut and dry, just as the jailbreak for OTB 1.1.2 was.
Note: If you have suggested to add something to the guide, I haven't ignored you. I research every fix and solution to ensure that the outcome will not be negative or fruitless to anyone before I add it to the guide. It takes time.Note: This is for the the Official Dev Team Upgrader "-3" VersionNote: This guide is only for those that are on AT&T and have an iPhone plan. I cannot guarantee the outcome if you do not.In case you have any expierence with jailbreaking, here it is a nutshell.
- DFU Restore to 1.1.3
- DFU Restore to 1.1.1
- Jailbreak 1.1.1 and Oktoprep
- Shift+Click+Update to 1.1.2
- Jailbreak 1.1.2
- Install BSD Subsystem 2
- Install Dev Team Official 1.1.3 Upgrader ("-3" version)
- Fix quirks (see bottom of post)
- Done
Requirements: Definitions - DFU Restore: While the phone is on, hold down the Power and Home buttons untill the phone reboots. Once the phone reboots, let go of the Power button and continue to hold down the Home button. Keep holding the Home button down untill the screen is completely black and iTunes recognizes a phone in restore mode. If there is anything on the screen of your iPhone, you are in Restore mode, not DFU Restore mode.
- iBrickr: The iBrickr.exe file where you extracted iBrickr.
- 1.1.2 Jailbreak: The windows.bat file where you extracted the 1.1.2-jailbreak.zip file.
Caveats - Anytime that your phone isn't booted up and stuck in recovery mode (incase I missed a step) and I move forward in the instructions, use iBrickr to boot it.
- Anytime that iTunes wants you to set up or restore your iPhone, set it up as a new iPhone.
Known Error Codes and Solutions - Error Code (1): You're not in DFU Restore mode.
- Error Code (1015): iTunes is dumb and your upgrade/downgrade was successful.
- Error Code (1062): You'll need to delete some files.
- Open my computer and goto C:Documents and Settings[your user name]Local SettingsTemp
- Hit CTRL+A and then hit Delete.
- Click OK or Yes to all to any prompts.
- Reboot your computer.
- Reinstall iTunes.
- Error Code (1603) & Error Code (1604): You need to restart a service.
- Click on Start -> Run and type in services.msc and click OK
- Find Apple Mobile Device and restart that service.
- iPhone not recognized unplug and try again: You'll need to delete some files.
- Open my computer and goto C:Documents and Settings[your user name]Local SettingsTemp
- Hit CTRL+A and then hit Delete.
- Click OK or Yes to all to any prompts.
- Reboot your computer.
- Reinstall iTunes.
Now that you have all the required items, let's continue.
JailbreakingUpgrading to 1.1.3Here, we're going to ensure that we have a clean 1.1.3 iPhone with out any junk left behind before we start. This means
everything you have on the iPhone will be gone after this. But that's okay. We need this. Just make sure you backup what you can.
- Start iTunes.
- Plug your phone into the computer.
- Wait untill iTunes recognizes your iPhone.
- Boot your iPhone into DFU Restore Mode
- Click OK on the iTunes error message letting you know there is a phone in restore mode.
- Shift+Click on Restore and select your 1.1.3 Firmware file.
- Let iTunes upgrade your iPhone to 1.1.3.
- Note: If you get an Error Code (1), you are not in DFU Restore Mode.
- You may or may not get an Error Code (1015). If you do, it's okay. Just click okay.
- Let iTunes boot your phone for you. If iTunes doesn't, use iBrickr to boot the phone.
- If iTunes gives you the option to restore a back up or set up as a new iPhone, select Set up as a new iPhone.
- Now you should be a clean and crisp 1.1.3 iPhone just as Apple intended.
Downgrading to 1.1.1Here we will downgrade our iPhones to 1.1.1 start the climb back up.
- With your iPhone still plugged into your computer/iTunes, reboot your iPhone into DFU Restore Mode.
- Once in DFU Restore Mode, click the OK button in the iTunes warning message.
- Shift+Click on Restore and select the 1.1.1 Firmware file you downloaded.
- Note: If you get an Error Code (1), you are not in DFU Restore Mode.
- Let iTunes install the 1.1.1 Firmware.
- Once it's done, you'll get an Error Code (1015), just click OK
- Now, Shift+Click on Restore AGAIN and select the 1.1.1 Firmware file you downloaded.
- Let iTunes install the 1.1.1 Firmware file AGAIN.
- Once it's done, you'll get another Error Code (1015), just click OK
- Now, use iBrickr to boot your phone back up.
- Once your phone has booted back up, you'll get an error message on your iPhone saying "Incorrect SIM", don't worry about it. Just press on.
Jailbreaking 1.1.1Here, we are going to jailbreak 1.1.1.
- Slide the Slide for emergency bar to get to the number pad.
- Dial *#306# and call, then hang up.
- Note: After dialing *#306# your phone may say "Please Wait..." for minute. Just be patient. It will bring you back to the Slide for emergency screen.
- Slide the Slide for emergency bar again.
- Dial 0 and call
- Then hit Answer
- Then hit Hold
- Then hit Decline
- You shold now be at the phone app for you iPhone. Tap the Contacts button.
- Add a new contact.
- Create a URL for the contact and type prefs:
- Create a new URL for the contact and type jailbreakme.com
- Save your new contact.
- Tap on the prefs: URL.
- Set your Auto-Lock to NEVER
- Set up your WiFi for you WiFi connection.
- Once those 2 steps are done, hit the home button.
- Slide the Slide for emergency bar again.
- Dial 0 and call
- Then hit Answer
- Then hit Hold
- Then hit Decline
- Tap the Contacts button again and select your new contact.
- Tap the Jailbreakme.com URL.
- Slide to the bottom of the page and tap Install AppSnap
- Let your phone install the jailbreak and reboot.
You are now a jailbroken 1.1.1. You should still have the
"Incorrect SIM" message but that is okay. We're working on that part still.
Prepping for 1.1.2Here we are going to do a few short steps to prep for the 1.1.2 upgrade.
- Slide the Slide to unlock bar.
- Tap Installer
- Ensure that your sources refresh. If it wants to upgrade to the new Installer, let it.
- Once done, goto Tweaks (1.1.1) and install Oktoprep
- Let Oktoprep do it's thing and you'll receive a message saying that you are good to go to upgrade to 1.1.2.
You are now ready for the upgrade to 1.1.2.
Upgrading to 1.1.2Here we will finally upgrade to 1.1.2.
- Ensure that iTunes is open and your iPhone is connected to your computer.
- Shift+Click on UPDATE and select your 1.1.2 Firmware file.
- Let iTunes upgrade your phone to 1.1.2.
- If you get an Error Code (1015) that's fine, just click OK
- If you're phone doesn't boot all the way up, use iBrickr to boot it.
You are now once again, at a clean 1.1.2. You will still have the
"Incorrect SIM" message, don't worry about it.
Jailbreaking 1.1.2Here are a few short steps to jailbreak 1.1.2
- Ensure that your iPhone is connected to your computer.
- Close iTunes.
- Click on Start -> Run and type in taskmgr and click OK
- Click on the Processes tab and select iTunesHelper.exe and click End Process.
- Click on Yes to the error message.
- Next, run the 1.1.2 jailbreak (windows.bat).
- Do NOT select "Install SSH". Just click on Jailbreak
- This will take a while, just let it do it's thing.
- Let it reboot your phone a couple of times.
You will now have a jailbroken 1.1.2 iPhone. You will still have the
"Incorrect SIM" message. Don't worry about it. We're getting there.
Prepping for 1.1.3We're almost there! This is the step before you have a beautiful 1.1.3 Jailbroken iPhone!
- If you need to, go ahead and set your WiFi settings back up.
- Ensure that your Auto-Lock is set to NEVER
- Tap on Installer on your iPhone.
- If it wants to update, let it.
- Ensure that you refresh your sources after the update!
- In Installer, tap All Packages and scroll down to BSD Subsystem 2
- Install the BSD Subsystem.
- Exit out of Installer and reboot your phone if necessary.
You are now ready to update your iPhone to 1.1.3.
Upgrading to 1.1.3That's right! We're here! The last step!
- Ensure that Auto-Lock is set to NEVER!
- Open Installer.
- Scroll down and tap on System.
- Tap on and install Official 1.1.3 Upgrader
- Select No to both options if you activiated in iTunes when you first got your iPhone.
- If you didn't activate in iTunes, you should say "Yes" to the Hactiviation prompt.
- Let the jailbreak do it's thing. It will take FOREVER!!!
- On the last step where it says Attempting to Reboot iPhone, let it sit there for a while (like 10-15 mins). If it hasn't rebooted yet, hold down the Power and Home buttons untill the phone reboots. As soon as the screen goes black, let go of both buttons. Then hold down the Power button to turn the iPhone back on. It will take a few minutes.
- Once done, plug your iPhone into your computer with iTunes open and let it activate itself.
- Set it up as a new iPhone in iTunes and just restore all your contacts. You'll be good to go from there.
You will now have a completely jailbroken 1.1.3 iPhone with all the cool stuff that 1.1.3 offers.
Fixing some quirks with the upgrade to 1.1.3This is how to fix any problems you may have once in 1.1.3 with out installing any crazy fixes.
- Sound: Just goto Settings -> General -> Reset -> Reset All Settings
- YouTube: Will be fixed when you fix the sound.
- Voicemail: Just tap the voicemail button and let it call your mailbox. Listen to the deleted messages prompt and hang up. Call it a couple of more times. Then, just be patient. In a few minutes, a window will pop up and ask you for your voicemail password. Type it in and you'll be good to go.
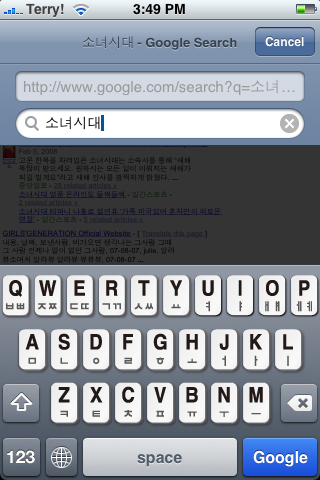
You're Done!!!!인터넷 상에 돌아다니는 수많은 iPhone 1.1.3 jailbreak 가이드가 있지만, AT&T의 iPhone 정식 plan 가입자에게 맞는 가장 제대로 된 가이드. AT&T iPhone 2년 약정 plan 사용자는 다른 헛짓거리 할 필요 없고, 1.1.3 factory software/firmware restore로 시작해서 1.1.1 restore, 1.1.1 jailbreak, 1.1.2 update, 1.1.2 jailbreak, 1.1.3 update+jailbreak 의 과정을 차근차근 밟으면 됩니다.
chmod 644 /System/Library/Frameworks/UIKit.framework/Keyboard-Common.artwork
chmod 644 /System/Library/Frameworks/UIKit.framework/Keyboard-Latin.artwork
chmod 755 /usr/lib/KMUIKeyboardImpl.dylib
그리고 Settings > General > Keyboard > International Keyboards > English(UK) 를 ON 시켜주면 한글 입력이 됩니다.